Posts Tagged ‘Wordpress’

Index your site on Google before it launches

June 1, 2010

The most important internet marketing tools and how to index your site on Google. This information is critical for new websites that are launching or have just gone through a major redesign. If you are a do it yourself-er (DIY) SEO manager, read this.[ad#ad-2]

Twitter, Gmail, WordPress, Facebook and your URL

Everyone remembers to look for a good URL to get their website started, but many people forget that they will also want to own the same names for their blog, Twitter account, Gmail and maybe even a (800) number. You want your website found as soon as possible when you launch it and the best things you can do to make sure you are found is to have many other accounts pointing to it even before it exists. I call this “Cabbage Patch Marketing”.

The Cabbage Patch Kids marketing company created demand first, through advertising, then released their product. This is not normally a marketing principle for a small business, but it works on the search engines. Give the search engines something to search for, on a popular site, and then when your site is available it can be indexed almost immediately. Just start doing a few searches for it organically through your pre-made links and your site will be indexed. No cost, no crazy link building, just search for your website through links that are already live. Follow these 5 steps to do it right.

5 steps to market your new website.

Get a URL with your keywords in the URL. I recommend getting it from a solid provider like IPOWER. They are a very inexpensive service and provide great, reliable service. They are by far one of the least expensive providers and offer many tools built into their service and have great customer service.

Tip #1 When you choose your web address try and stay away from hyphens or dashes in your URL if possible and get your website up ASAP. Even if it’s not very good, you can make it better later when you are making money.

Tip #2 Set up a Twitter account with your URL as the name (or at least a phrase that mentions your URL).

Set up a link to your website from your new twitter account before the site exists and start Twittering with people. This will be your first of many links that you will need for your new site. One goal for you will be to get into conversations with highly publicized organizations on Twitter. These tweets can quickly show up in organic searches for your company name and will show up in your organic search results.[ad#ad-2]

Tip#3 If you don’t have a Facebook account get one.

Your business or service needs to be public and here is a place you can talk about your new website to your friends and put out links to products and services you may offer without being salesy.

Tip#4 Get a LinkedIn and Gmail account

If you are serious about SEO it is almost required to have a Gmail account. At some point I bet you will get one so why nt do it now?. Also, you want people to be able to contact you if they are interested, even if your website is still in its infancy stages. Overall, Gmail is a great place to start because of its access to other tools like Google Analytics and its ability to use for logging into many different accounts on the web like YouTube and Facebook. Now go to your LinkedIn account and set up a link to your website.

Tip#5 Download WordPress (it’s free) and host your blog on your website using the Thesis theme.

WordPress is not just for blogs and the Thesis theme will make your site look great. It has a minimal cost, but it will help you make a beautiful website not just a blog. This is a one-time investment in your new website and well worth it because it will teach you how to make a great site that is search engine friendly and will help your SEO. It will also ensure that you get your blog up quickly and it can be hosted directly on your new website.

If you are not ready to spend money on your website there are other services like Blogger that will get the job done, but I wouldn’t recommend them unless you are only blogging for fun. Best practices say to have a blog on your website, because this will keep more of your traffic on your website. This is important if you are selling a product or offering a service. Having your new blog entries on your home page will also boost your SEO because your website will constantly be hosting new content as you write articles.
[ad#ad-2]

How to reset wordpress admin password

May 30, 2010

wordpress-login-screenI was searching for the way for resetting the wordpress password better than the PhpMyAdmin Pass change method, and founded at http://blog.skdev.net where Salman Mehmood have created a script for resetting the WordPress password.

You can download the script here.

[ad#ad-2]

Installation Guide:

Step 1:

step-ftp

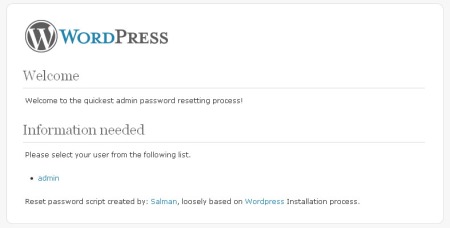
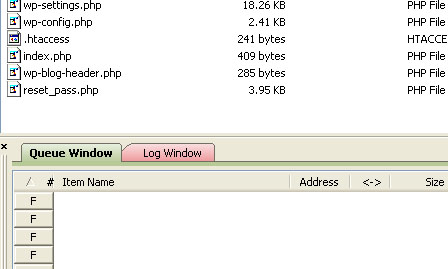
Download this file “WordPress: Reset Admin Password Script“, Extract & Upload it in your WordPress directory (it must share the same folder with wp-config.php).

Step 2):

step1
Open it in your browser (ex: http://yoursite.com/wordpress/reset_pass.php)%5Bad#ad-2%5D

Step 3):

step2
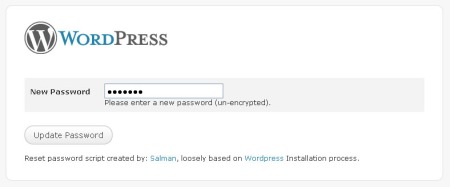
Click on your Username, enter a new password and click submit, your password is updated. You can login with your new password now.

Step 4):

step3[ad#ad-2]
For security reasons it is advised to either delete OR rename reset_pass.php on your server.

IO Error Uploading Images from WordPress

May 28, 2010

Recently I encoured a problem, that I was unable to upload any image to my posts in flash uploader mode..

IO Error Uploading Images in WordPress. When browsing a local drive for a picture to upload, you may encounter the: IO error. An error occurred in the upload. Please try again later. It seems there are a lot of WordPress users, including myself that have encountered this issue. In the following simple solution, I’ll show you what I did to address the problem and get my WordPress Image uploads to stick.

An error occurred in the upload. please try again later

staticmap

Solutions:

1)  Use Simple Uploader Rather then Flash Uploader:

  1. Click the option Browser uploader instead
  2. Proceed to Browse to the file on your computer and click Upload

2) Fix the WordPress IO Error Permanently:

  1. From your Desktop, click Start -> Run and type appwiz.cpl and press Enter
  2. From the Add or Remove Programs list, select Adobe Flash Player ActiveX and click Remove

    remove-flash

  3. Now, simply Download and reinstall Adobe Flash Player

Solved “There was a problem opening a secure connection to Google.” Error 110

May 16, 2010

migration-imgHave you got this error while importing posts from Blogger to WordPress? It says:

There was a problem opening a secure connection to Google. This is what went wrong:

Connection timed out (110)
[ad#ad-2]
It is simply because you don’t have SSL support in your server. To import posts, your WordPress hosting server needs to create a HTTPS session with your Google account. So if you are looking to transfer from Blogger to WordPress & buy a paid hosting for that, then you should check whether your hosting package supports SSL or not.

If you are using free hosting, still you can import it.by following the steps below:

1) Create a wordpress.com blog.

2) Then import from Blogger to that blog. You would have no problem as wordpress.com admin is on secure server.

3) Then create an export file from it.

4) Now import that file in your own WordPress blog.

[ad#ad-2]Remember to delete the wordpress.com blog then. Otherwise, you may get penalized for duplicate content.

16 Things Necessary to Do After Starting New WordPress Blog

May 6, 2010

You just started a new WordPress blog, now what’s next? Read on…

 
1. Blog Design: You can start with a freely available WordPress theme, but a unique blog design is the way to go if you want your blog to stand out from the other blogs.

 
2. Add Categories: Add the categories for your blog. Remember to keep it neat and add not more than 15-20 categories.

 
3. Add an About Page: I have already wrote about the importance of an About page, add it and let your readers know who you are.

 
4. Install All In One SEO Pack: Install the latest version of All In One SEO Pack WordPress plugin and optimize your new blog from the beginning itself. Remember to visit the plugin’s option page. Also check out the other WordPress Plugins that can optimize your blog for Search Engines.

 
5. Customize Permalink Structure: Choose a good Permalink Structure and stick with it. Here are some examples of good Permalinks: /%year%/%monthnum%/%day%/%postname%/ /%postname%/ If you change your permalink structure after you have been linked by other sites, those links won’t work anymore. So remember to stick with the Permalink Structure you chose in the beginning

 
6. Create a FeedBurner feed for your blog: Login to FeedBurner and create a FeedBurner feed for your new blog

 
7. Install the FeedBurner FeedSmith plugin: The FeedBurner FeedSmith plugin detects all ways to access your original WordPress feeds and redirects them to your FeedBurner feed so you can track every possible subscriber

 
8. Put a RSS button on your blog: Choose one of these RSS buttons and put it on your blog linking it to your FeedBurner feed

 
9. Start Writing: What’s a blog without content? Start blogging!

 
10. Install the Google Sitemaps plugin: This plugin will generate a sitemaps.org compatible sitemap of your WordPress blog which is supported by Ask.com, Google, MSN Search and YAHOO. Download the latest version of the plugin from here.

 
11. Create a Robots.txt file: Once you have generated your sitemap with the Google Sitemaps plugin, create a robots.txt file and add your sitemap there like in the following example:

Sitemap: http://www.yourblog.com/sitemap.xml

User-agent: *

Disallow: /wp-content/

Disallow: /wp-admin/

Disallow: /wp-includes/

Disallow: /wp-

Disallow: /feed/

Disallow: /trackback/

Disallow: /cgi-bin/

User-agent: Googlebot

Disallow: /*.php$

Disallow: /*.js$

Disallow: /*.cgi$

Disallow: /*.xhtml$

Disallow: /*.php*

Disallow: */trackback*

Disallow: /*?*

Disallow: /z/

Disallow: /wp-*

Disallow: /*.inc$

Disallow: /*.css$

Disallow: /*.txt$

 
12. Add your Sitemap to Google Webmaster Tools: Add your new site to Google Webmaster Tools and then your sitemap too. Once you add your site, you will be able to find when Googlebot last successfully accessed your home page, web crawl errors, etc.

 
13. Set preferred domain: Select your site from your Google Webmaster Tools dashboard and set your preferred domain (with or without www) by going to Tools>Set preferred domain.

 
14. Install Akismet plugin: Download and install Akismet plugin to catch comment spam.

 
15. Add a Contact form: Install a plugin that adds a contact form to your blog so that your readers can get in touch with you. I use PXS Mail Form.

 
16. Install Subscribe to Comments: Install the Subscribe to Comments plugin which allows commenters on your blog to check a box before commenting and get e-mail notification of further comments. This encourages readers to come back and take part in the conversation.

I haven’t mentioned the Related posts plugin as it isn’t much of a use until you have lots of posts.

Have I missed anything? Let me know through comments and I will add it to the list.

SEO for WordPress – The Complete Guide

April 3, 2010

[ad#plz-use-me]

wpseo[1]I’m an SEO and I have been working a lot with WordPress, here I give you all my tips for you to rank very well in Google with your blog.

UPDATE: This article was written in march 2007 and has not been updated since then, although many parts are still relevant. You should see my latest article about WordPress: Hacks to boost your WordPress 2.7 blog.

[ad#plz-use-me]

Quick Facts

  1. There are 55 million blogs out there, if you don’t stand out you will have no chance.
  2. The first second of a visitors attention is the most crucial.
  3. Your main traffic should come to articles and posts inside your blog, not the home page.
  4. Search engine rankings relies heavily upon the quality and quantity of links to your blog when they determine the ranking.
  5. The best way to get links is by natural recommendations from other bloggers or web site owners.

Section 1: Optimize Your Blog

Usually the WordPress themes are well designed and structured already but there are a number of things you really should do to improve it for better optimization for search engines.

Using the best URLs

To enable the permalinks is easy and you have probably already done that, just go to Options -> Permalinks in the admin panel. But what format is the best to choose? The structure /%postname%/ – nothing else. This is best because your URLs to your articles should never change. And if you have it like this it does not matter if you change the category of the article or republish it with a new date, it will always be the same URL (more about that later). And if you happen to have two posts with the same title it is not a problem as WordPress will automatically add “-2″ in the end.

Have you been using the wrong format? Well, if your blog is not totally new you should not change. It is not vital and for the next time you make a blog you know how to make it right.

Handling URL Canonization

Every WordPress blog has an issue in which there are 4 different URLs for the same post and this has to be fixed to prevent dilution. Follow my guide on how to fix it here.

Title Tags

The title tag is the most important HTML-tag in terms of SEO.

Here are different versions you should use inside the <title></title> located in theme/header.php

Optimum ranking:
<?php if(is_home()) { echo 'Your blogs name | Few important words'; } else { wp_title('') ;} ?>

For branding purposes:
<?php if(is_home()) { echo 'Your blogs name | Few important words'; } else { echo 'Your blogs name:'; wp_title('') ;} ?>

The best title tag solution for advanced users

Either install and properly use the SEO Title Tag plugin or do the following:

  1. Download and install this plugin.
  2. Replace <?php get_header(); ?> with the context in header.php on single.php, page.php and category.php.
  3. Work out the best titles for the different versions and use the plugin to create different versions of category.php and single.php with their own versions of title tags. For example if your category with ID 5 is “SEO News” you could have the following title tag in single-cat-5.php:
    <title>SEO News: <?php { wp_title('') ;} ?></title>
    In category.php you could have: <title><?php { wp_title('') ;} ?> | Your Name</title>

Headings

Headings are defined by HTML with H1 (largest) to H6 (smallest). You need to use them in your articles when you write. Your article title should be in a main heading (H1), sub headings with H2 and small headings with H3.

Make sure that in theme/single.php this code <?php the_title(); ?> is wrapped in H1 so that it looks like:
<h1><?php the_title(); ?></h1>

If your theme designer already used a specific CSS design for the heading tags you can do like this:

  1. Open up theme/single.php and add <div class=”singleheadings”> to the top after <?php get_header(); ?> and </div> to the bottom before <?php get_footer(); ?>.
  2. Add then add for example the following lines of CSS to your CSS file:
    .singleheadings h1 {font-size:XXpx;font-family:XX}
    .singleheadings h2 {font-size:XXpx;font-family:XX}
    .singleheadings h3 {font-size:XXpx;font-family:XX}

You can change your quicktags by for example using this file instead (also add H2 to the file) so that you easily can insert heading tags when you write.

Navigation

Most of the link power is coming to the home page of your blog and gets distributed evenly among the rest of the links on that page. So in additional to having a good navigation structure for your visitors also do the following:

  • Have links to the most important articles and pages from your home page. That can easily be achieved by making a category with your best articles and using the WP Category Postplugin to make a list of them on the index.php file.
  • Install the Related Posts plugin and have your articles link to similar articles.
  • Also link yourself to previous articles you have written.
  • Place the attribute rel=”nofollow” on links that are totally useless for search engines such as to RSS feeds for the blog and comment links. In case you want to remove the nofollow on the comment links make sure you check the author links before approval as it is important that you don’t link to bad sites from your blog.
  • You should not have hundreds of external links on the home page, if you have that I recommend that you place them on a separate page.

Site Map

A Site Map is where your visitors go to navigate and find specific articles and posts on your blog. It is also a place for search engines to find links to all your pages on your blog.

[ad#plz-use-me]

Use my article on how to make an automatic WordPresss Site Map and add one for your blog. I prefer that you make the first version in the guide.

What about a Google Sitemap?

It is not needed. There is no reason for a WordPress blog with a proper navigation structure to submit a Google Sitemap other than for information purposes. A Google Sitemap does not improve your ranking, only crawling, and that is not a problem.

Design

Everyone has different tastes about design but here are points to think about when you design your blog:

  • Keep the design simple, very simple.
  • Have the body text big with big and clear headings.
  • For some reason blogs are not liked in the big social network sites (like digg, reddit etc) so make your theme unique and try to make it look like a site and not a blog.
  • Make sure nothing steals attention from your text.
  • The text width should not be longer than one and a half alphabet, even shorter.
  • When a visitor reaches an article on your blog, the text should be seen instantly. Have the text as far up as possible. A visitor should not have to scroll to reach the content.
  • If you are not making decent money with ads I suggest you to erase all ads you have on the blog.

What About the Meta Tags?

There are various WP plugins out there for this but to be honest and frank I can tell you that they are not worth the effort. The meta keywords tag are not used anymore (or extremely little) in the ranking calculation and while the meta description tag can show up in the SERPs I consider the snippet of text the visitor gets being better.

CSS Positioning

It has been said that by providing the important content first in the source code it will make a positive difference in your search engine ranking. I am not sure if this is true, but it won’t hurt to do it. For example on this blog the navigation on the left is in the bottom of the code.

Section 2: How to Craft Your Articles

You should read the entire section of Authoring High Quality Content by Mr. Fishkin but I give you here a very quick summary as it relates to this article.

First the most important quote:

One Great Page is Worth a Thousand Good Pages

While hundreds or dozens of on-topic pages that cover sections of an industry are valuable to a website’s growth, it is actually far better to invest a significant amount of time and energy producing a few articles/resources of truly exceptional quality. To create documents that become “industry standard” on the web and are pointed to time after time as the “source” for further investigations, claims, documents, etc. is to truly succeed in the rankings battle. The value of “owning” this traffic and link source far outweighs a myriad of articles that are rarely read or linked to.

Write articles or posts that serves as a stand alone document. This means there is everything valuable collected on that page on that specific topic. For example a stand alone document on “SEO for WordPress” should have everything on that page and the reader should not need any other articles on that topic.

Better 1 great article that you revise 10 times than 10 smaller ok articles.

To do this you can also rewrite and republish your old articles with the current time to show up again as the latest article.

Include links to more reading if applicable

Withing or at the end of your article you should link to other sources so that the reader can read more if he is interested. You can also use this as sources if you got your writing materials from other places.

Headlines

You should write the kind of headlines to your articles that:

  • Contains important keyword combinations or phrase for ranking
  • Describes with great interest what the article is about
  • Makes the reader want to read it and clicks on it in the SERPs
  • And is short and to the point

Section 3: Increase User Interaction

  • Use polls from for example Poll Daddy.
  • Increase the commenting field for longer user comments and better interaction. This also provides more unique content to your articles.
  • Install the Subscribe to Comments plugin.
  • Actually do reply to your commenters and answer their questions.
  • If you revise an article based on a comment, do link and give credit to the commenter.

Section 4: Get Links

  • The art of writing the kind of content that get natural links is called link baiting. See my article on that with a list of ideas here.
  • Post your link baits on the major social network sites such as digg, reddit and the others.
  • Install my Link to Me Textbox WordPess Plugin which provides an automatic HTML box of code for easy linking to you.
  • Regularly link and reference other bloggers in your field in your posts to get attention from them. You loose nothing of it and many of them will return the favor and link to you. Also comment on their blogs to make them discover your blog.
  • Read and follow my Link Building

[ad#plz-use-me]

WordPress-How to share blog post in email signature?

April 1, 2010

wordpress_logo[1][ad#plz-use-me]

With WiseStamp email signature you can easily promote and share in your email signature your latest and most fresh Wordpress WordPress blog post, via your WordPress blog Blog RSS RSS feed.

Follow those simple steps:

  1. Install WiseStamp email signature (Firefox addon).
  2. Copy (Ctrl+C) your blog’s RSS feed.
  3. Open WiseStamp in your browser.
  4. Select the “RSS” tab and insert (Ctrl+V) the copied link into the “feed url” filed.
  5. Click on the Apply button.

That’s it!

Not sure how to find your WordPress blog RSS Feed?

After the following steps a link to your latest post will update automatically in your WiseStamp email signature.[ad#plz-use-me]

How to Move WordPress Blog to New Domain or Location

March 30, 2010

[ad#plz-use-me]

2913018697_ccbb33e993[1] For blogger who self-hosts the WordPress blog publishing system on a web hosting server with own registered domain name, sometimes, you may decide to reorganize the blog link URL to make it tidier or to reflect new focus or theme of the blog. If you decide to change the URL or link location of your WordPress blog due to changing of domain name (such as from http://www.old-domain.com/ to http://www.new-domain.com/) or the blog to another directory location (such as from http://www.domain.com/ to http://www.domain.com/blog/), there are some steps that should be done to ensure the proper migration and no breaking links.

The tricky part when moving WordPress blog to another location is that WordPress is using absolute path in URL link instead of relative path in URL link location when stores some parameters in database. Within blog posts’ contents itself, users may also use the old URLs when creating reference backlinks. All these values in the database will need to be changed when WordPress is moved. The following guide will show you which database fields that has references or values related to blog’s URLs that you want to modify. Note that this guide is not about how to move WordPress blog from one server or host to another new hosting service.

Once the blog has been moved (all files copy over in case of moving location or server or new domain name properly propagated across Internet for new domain name), the first thing to change is to tell WordPress the new blog location (wp-config.php should be no changes, and .htaccess file should be also no changes. If for some reason mod_rewrite rules for friendly URLs no longer works, you can always regenerate the .htaccess file via WP Administration’s Update Permalinks page). This value can be changed via WordPress Options page, but if you no longer able to access to old blog URL, you have to modify the value via MySQL database.

Note: The guide uses SQL statements based on MySQL replace() function to modify the database. To run SQL queries, login to MySQL database that houses WordPress tables via phpMyAdmin or login to the DB server and run MySQL client as root.[ad#plz-use-me]

To update WordPress options with the new blog location, use the following SQL command:

UPDATE wp_options SET option_value = replace(option_value, 'http://www.old-domain.com', 'http://www.new-domain.com') WHERE option_name = 'home' OR option_name = 'siteurl';

After that you will need to fix URLs of the WordPress posts and pages, which translated from post slug, and stored in database wp_posts table as guid field. The URL values in this field are stored as absolute URLs instead of relative URLs, so it needs to be changed with the following SQL query:

UPDATE wp_posts SET guid = replace(guid, 'http://www.old-domain.com','http://www.new-domain.com');

If you have linked internally within blog posts or pages with absolute URLs, these links will point to wrong locations after you move the blog location. Use the following SQL commands to fix all internal links to own blog in all WordPress posts and pages:

UPDATE wp_posts SET post_content = replace(post_content, 'http://www.old-domain.com', 'http://www.new-domain.com');

Browse through WordPress blog to check if everything is okay. You also need to re-login to WP Administration as authentication cookie has now became invalid due to different domain.[ad#plz-use-me]

Trouble-Shooting the WordPress Security White Paper.

March 30, 2010

[ad#plz-use-me]

I’ve been following the activity over at Ehelper.info , their activities are very interesting and quite commendable. After some shameless delay I decided to read though their WP Security White Paper and apply some of the steps… yes I did say some, harden security folk will insist that you should follow all of the whitepaper to be security, which is probably true, but one should never forget that security is about risk… and in basic terms accessibility vs security, for example I won’t ever lock my wp-admin down to a single IP as I’ve been know to blog at work, home, around my parents place and even moderate comments on the train! Thus my wp-admin isn’t as secure as someone who did lock it down, but this is a risk I’m willing to live with.

One of the area’s that I did like was the tightening up of wp-includes & wp-content, but before you jump in and copy/paste what’s in the pdf into .htaccess, you should be prepared for some work. Basically


Order Allow,Deny
Deny from all
<Files ~ ".(css|jpe?g|png|gif|js)$">
Allow from all
</Files>

when applied stops any file except .css,.jpeg/jpg, .png, .gif & .js from being accessible; now this is great for stopping zero-day remote file includes from php files but it will mean that any php file (even those you may want access to) will be restricted. What I’ve decided to do below is document what changes you need to make to the recommendation to get some popular plugins to work…. This approach will also have a long term impact on the “hardening plug-in” that the blogsecurity team are planning; basically the issue is – the default recommended .htaccess will break plugins, the number of plugins avilable for a wordpress install is unlimited thus they will need to provide a community driven configuration repository that the plugin can draw upon to open things up for specific plugins.

For the purpose of this documentation, I’m going to assume wordpress is installed in/var/www/html so please change appropriately.

For those who use the rich editor and need the spell checker, you’ll need to add this to your/var/www/html/wp-includes/js/tinymce/plugins/spellchecker/.htaccess


# Open up the spellchecker
<Files "tinyspell.php">
Allow from all
</Files>

To get the popular WP-Cache plugin to work changes are made to:/var/www/html/wp-content/.htaccess

Order Allow,Deny
Deny from all
<Files ~ ".(css|jpe?g|png|gif|js|html)$">
Allow from all
</Files>

This will allow the static html files in the cache to be downloaded, now I didn’t get to the bottom of this, but I believe that the wp-cahe php files might be called directly, so if you are having problems see if this resolves it…[ad#ad-2]

<Files ~ "wp-cache">
Allow from all
</Files>

This will open up the wp-cache files as if you hadn’t installed the .htaccess in the 1st place – you have been warned, now you evaluate the risk :)

If you are using the google site map generator, then you can create a .htaccess file in/var/www/html/wp-content/plugins/google-sitemap-generator to allow the xml style sheet through:

<Files "sitemap.xsl">
Allow from all
</Files>

The final one that might interest people is Share This, you’ll need at .htaccess in/var/www/html/wp-content/plugins/share-this with:

<Files "share-this.php">
Allow from all
</Files>

As you might have gathered this does involve creating a lot of .htaccess files, which is a bit of a pain, if you’re fortunate enough to run your own web server and have access to your httpd.conf you can actually keep these all in one file, keeping with the last share this example, instead of creating a .htaccess in /var/www/html/wp-content/plugins/share-this you can edit your httpd.conf and just wrap the code in <Directory>, so you could actually paste this:
<Directory "/var/www/html/wp-content/plugins/share-this/">

<Files "share-this.php">
Allow from all
</Files>
</Directory>

I hope this all makes sense,[ad#plz-use-me]

4 Things That Are Getting Rankings and Page Rank

March 26, 2010

seo-kursuDespite my love for SEO and my presence in the industry for almost 5 years, I have to admit that I barely followed the latest trends over the last 12 months. 95% of SEO related feeds disappeared from my Google Reader account and I stopped manually checking some of the biggest resources in this niche.[ad#ad-2]

The main reason for this is that I no longer work with clients so new tactics and many advanced SEO methods didn’t matter to me that much. I was also at the point where I felt I was getting overloaded with the same information or bad advice, instead of sticking with the basics and going with what I know.

Instead of reading 30+ SEO feeds per day and watching every Matt Cutts video like it was a direct message from God, I shut out all the noise and just started building websites around things I love. In the 12 months since going solo I’ve had more success than the previous four years and I’ve gained rankings for a large number of very competitive keyphrases.

I’m not suggesting that you ignore the industry and try everything yourself, as there is a lot of good information out there (especially from the likes of SEOmoz, Aaron, Sebastian, Rishi and David).

What I do suggest is that you go with what works and stick to it consistently, rather than constantly looking for magic-bullets to increase your rankings. Today I want to share four things that have been working very well for me in increasing my own rankings.

1. Get People “Googling” Your Brand

Many people may disagree that this is useful in improving your rankings, but I’ve seen far too many examples of this tactic working well to dismiss it. I stumbled upon this idea when I released a free eBook which received thousands of downloads, and mentioned a website of mine while mistakenly forgetting to link to it.

Because the site in question was an integral part of the guide, people started “Googling” the phrase. Within the first 30 days of launching the site there had already been 500 people searching for it in Google and landing on the domain.

The reason I say this is because this website ranked 2nd in Google for its main keyphrase very, very quickly, without the link juice to usually grant such a high ranking. The site literally had 5 links compared to the hundreds that competing websites had which were also much older.

Thinking about this logically, it makes sense that Google and other search engines would want to rank a page highly when people are searching for the brand name directly. I believe that because so many people were looking for the site and having to go to page 3 or 4 to find it, the rankings improved because Google want to show the best results to their users.

Google have said that this does play a part in the algorithm, but I was surprised at how big an effect it had. I don’t recommend you do this for all sites, but if you release something or mention a product, try just mentioning the name and not linking to the site (not always, of course). Get people searching for your brand / domain directly and see what that does to your rankings.

2. Monitor Repeat Sellers on Flippa.com[ad#ad-2]

I was contemplating whether or not to reveal this as it has given me some ridiculously awesome link ideas, but I try to provide as much value as I can, so here goes. If you head on over to Flippa you can find people buying and selling a lot of successful and high ranking websites.

What I’ve noticed is that some people are selling a lot of content websites that are ranking for great phrases very quickly and very easily. If you look hard enough you can find sites making $5,000+ per month from rankings they’ve achieved in just 2-3 months.

Instead of buying these sites in all cases, I’ve simply looked at where the backlinks are coming from and figured out how the seller is able to duplicate them so easily. I’ve seen sites ranking with nothing but spammy chinese blog links and other sites ranking with freely available link sources and making a lot of money.

If you have the time to look around, there are some real link gems to be found.

3. Utilise Guest Blogging in Your Niche

In 2009 I wrote more personal development related guest posts than anybody else and in return built a blog with over 6,000 subscribers. I recently sold the site for a mid five-figure fee, but still use this tactic for a number of other sites. (I know Youmoz links are nofollow, so I’m not using this as an example).

Apart from ranking number one in Google for “Guest Blogging” (;)), the tactic allowed me to rank on the first page of Google for two phrases which each get over 30,000 exact searches per month. One of which, was the phrase personal development.

I’ve wrote a 2,000+ word post on guest blogging over here so I’m not going repeat everything I said there, but utilising this method is very simple:

* Find the top blogs in your niche and see if they have clear opportunities for guest posting. If not, contact them. If so, contact them.
* Perform Google searches like niche “guest post” or niche “write for us” to find more sources for your content
* Once you get an opportunity, write an excellent article and send it off to the editor / site owner. I prefer to send my posts as text files with HTML inside so it’s easy for them to paste into WordPress and keeps your links intact.
* Put a non-spammy, anchor text link in the bottom of the guest post which will not only be great for rankings but also send traffic to your site
* You get links and traffic, and the site owner gets excellent, free content for their community

I have noticed a few big name SEO’s abusing this already (I won’t say who) so I don’t know how long this tactic will remain effective, but it’s working well for now and is probably hard to algorithmically block in all cases.

4. Dirty Bookmarking Links

I don’t know why, but social bookmarking links (even automated ones) are helping some of my sites massively. I don’t love using this tactic as it feels kind of dirty but I can’t deny that it is working well.

The two instances I find it working best are:

* 1. On authority sites that have tons of links but need links with more specific anchor text
* 2. On new sites in small, fairly uncompetitive niches

Trying this for competitive phrases on sites that are either new or don’t have many links doesn’t seem to be doing much, but for the two examples above I’m amazed at how useful this has been.[ad#ad-2]