Archive for the ‘Wordpress’ Category

Plugin: WP-PageNavi Fatal Error

June 11, 2010

wordpress

Many of will have facing this error while using the latest version of wp-pagenavi. I faced the problem when I tried to upgrade from the older version to newer one.

Problem Statement:

Getting the below error when activate or install the wp-pagenavi:

Parse error: syntax error, unexpected T_STATIC, expecting T_OLD_FUNCTION or T_FUNCTION or T_VAR or ‘}’ in /……/wp-content/plugins/wp-pagenavi/wp-pagenavi.php on line 189 or 179

Reason and Solution:

PHP5 requirement

In order to run WP-Pagenavi version 2.70 or newer, your host needs to be running PHP5. If you get a fatal error on activation, ask your hosting provider to upgrade your account from PHP4 (which is old, slow and a security risk).

To see what PHP version you’re really running, add this line to wp-config.php:

var_dump(PHP_VERSION);

You can get the earlier version of the plugin by Clicking here.

[via scribu]

Index your site on Google before it launches

June 1, 2010

The most important internet marketing tools and how to index your site on Google. This information is critical for new websites that are launching or have just gone through a major redesign. If you are a do it yourself-er (DIY) SEO manager, read this.[ad#ad-2]

Twitter, Gmail, WordPress, Facebook and your URL

Everyone remembers to look for a good URL to get their website started, but many people forget that they will also want to own the same names for their blog, Twitter account, Gmail and maybe even a (800) number. You want your website found as soon as possible when you launch it and the best things you can do to make sure you are found is to have many other accounts pointing to it even before it exists. I call this “Cabbage Patch Marketing”.

The Cabbage Patch Kids marketing company created demand first, through advertising, then released their product. This is not normally a marketing principle for a small business, but it works on the search engines. Give the search engines something to search for, on a popular site, and then when your site is available it can be indexed almost immediately. Just start doing a few searches for it organically through your pre-made links and your site will be indexed. No cost, no crazy link building, just search for your website through links that are already live. Follow these 5 steps to do it right.

5 steps to market your new website.

Get a URL with your keywords in the URL. I recommend getting it from a solid provider like IPOWER. They are a very inexpensive service and provide great, reliable service. They are by far one of the least expensive providers and offer many tools built into their service and have great customer service.

Tip #1 When you choose your web address try and stay away from hyphens or dashes in your URL if possible and get your website up ASAP. Even if it’s not very good, you can make it better later when you are making money.

Tip #2 Set up a Twitter account with your URL as the name (or at least a phrase that mentions your URL).

Set up a link to your website from your new twitter account before the site exists and start Twittering with people. This will be your first of many links that you will need for your new site. One goal for you will be to get into conversations with highly publicized organizations on Twitter. These tweets can quickly show up in organic searches for your company name and will show up in your organic search results.[ad#ad-2]

Tip#3 If you don’t have a Facebook account get one.

Your business or service needs to be public and here is a place you can talk about your new website to your friends and put out links to products and services you may offer without being salesy.

Tip#4 Get a LinkedIn and Gmail account

If you are serious about SEO it is almost required to have a Gmail account. At some point I bet you will get one so why nt do it now?. Also, you want people to be able to contact you if they are interested, even if your website is still in its infancy stages. Overall, Gmail is a great place to start because of its access to other tools like Google Analytics and its ability to use for logging into many different accounts on the web like YouTube and Facebook. Now go to your LinkedIn account and set up a link to your website.

Tip#5 Download WordPress (it’s free) and host your blog on your website using the Thesis theme.

WordPress is not just for blogs and the Thesis theme will make your site look great. It has a minimal cost, but it will help you make a beautiful website not just a blog. This is a one-time investment in your new website and well worth it because it will teach you how to make a great site that is search engine friendly and will help your SEO. It will also ensure that you get your blog up quickly and it can be hosted directly on your new website.

If you are not ready to spend money on your website there are other services like Blogger that will get the job done, but I wouldn’t recommend them unless you are only blogging for fun. Best practices say to have a blog on your website, because this will keep more of your traffic on your website. This is important if you are selling a product or offering a service. Having your new blog entries on your home page will also boost your SEO because your website will constantly be hosting new content as you write articles.
[ad#ad-2]

6 Ways to Get Your Site Indexed By Today

May 31, 2010

[ad#ad-2]
If your website is not indexed by search engines, it will not appear on the search engine listings. Therefore, when your website is live, the first thing you must do is to let the search engines notice your website and index it. In this article, let me share with you 5 ways to get your site indexed by today:

1. Submitting a XML sitemap to search engines. The xml sitemap includes links to every page of your website. It is a file that you can submit to search engines to get your pages indexed. By submitting your xml sitemap, you will notify the search engines about your website and index every page of it. You can upload your sitemap to Google by creating a free Google Webmaster account.

2. Create a HTML sitemap page on your website. A HTML sitemap is very different from a xml sitemap file. A HTML sitemap is a page on your website that is visible to your visitors. It will list down all the links to every page of your site. This allows visitors to navigate your site easily and allow search engine spiders to follow the links and discover all pages.

3. Place HTML text links on your website. Search engine spiders follow HTML text links to discover other pages of your website. Therefore, you must ensure that you use HTML text links for simple navigation menu so that search engine spiders can follow. Also, you should hyperlink keywords within your content and point them to other pages of your site. This is a good way to tell search engines what pages are important.

4. Directory submission. Submit your website URL to a list of SEO-friendly directories. DMOZ, Yahoo Directory and BOTW are important directories that you must submit your website to. It is, however, not all directory submission is free. Some may require you to pay a small fee for your website submission.

5. Article marketing. Write articles and place your website URL in the Author Resource Box. Then submit your articles to a few popular article directories. Once your articles are approved and published, your URL will be live online and this allows search engine spiders to follow the link to discover your website.

6. Using social websites. Social media sites are generally indexed regularly by search engines. So by placing your website URL on social sites, search engines spiders can discover your URL very quickly and index your new website.

Before a website can rank high and get organic search engine traffic, it needs to be indexed first. Search engine spiders are looking for new websites and pages every day. By getting a link on sites that get indexed regularly, it will ensure that your new website get indexed quickly.[ad#ad-2]

How to reset wordpress admin password

May 30, 2010

wordpress-login-screenI was searching for the way for resetting the wordpress password better than the PhpMyAdmin Pass change method, and founded at http://blog.skdev.net where Salman Mehmood have created a script for resetting the WordPress password.

You can download the script here.

[ad#ad-2]

Installation Guide:

Step 1:

step-ftp

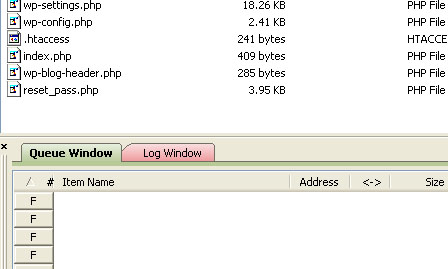
Download this file “WordPress: Reset Admin Password Script“, Extract & Upload it in your WordPress directory (it must share the same folder with wp-config.php).

Step 2):

step1
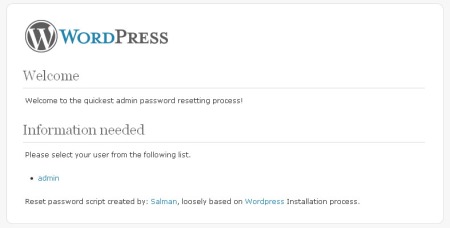
Open it in your browser (ex: http://yoursite.com/wordpress/reset_pass.php)%5Bad#ad-2%5D

Step 3):

step2
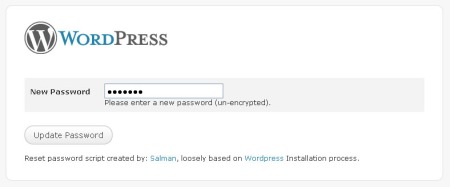
Click on your Username, enter a new password and click submit, your password is updated. You can login with your new password now.

Step 4):

step3[ad#ad-2]
For security reasons it is advised to either delete OR rename reset_pass.php on your server.

Load images when user scroll down

May 30, 2010

Pages contain large images and data are loaded very slowly..The situation becomes more terrible when using slow internet connection

To increase the load speed of your WordPress blog, you should install jQuery Image Lazy Load WP plugin.

Lazy loader is a jQuery plugin written in JavaScript. It delays loading of images in (long) web pages. Images outside of viewport (visible part of web page) wont be loaded before user scrolls to them. This is opposite of  image preloading.

Using lazy load on long web pages containing many large images makes the page load faster. Browser will be in ready state after loading visible images. In some cases it can also help to reduce server load.

Click Here to download the plugin

IO Error Uploading Images from WordPress

May 28, 2010

Recently I encoured a problem, that I was unable to upload any image to my posts in flash uploader mode..

IO Error Uploading Images in WordPress. When browsing a local drive for a picture to upload, you may encounter the: IO error. An error occurred in the upload. Please try again later. It seems there are a lot of WordPress users, including myself that have encountered this issue. In the following simple solution, I’ll show you what I did to address the problem and get my WordPress Image uploads to stick.

An error occurred in the upload. please try again later

staticmap

Solutions:

1)  Use Simple Uploader Rather then Flash Uploader:

  1. Click the option Browser uploader instead
  2. Proceed to Browse to the file on your computer and click Upload

2) Fix the WordPress IO Error Permanently:

  1. From your Desktop, click Start -> Run and type appwiz.cpl and press Enter
  2. From the Add or Remove Programs list, select Adobe Flash Player ActiveX and click Remove

    remove-flash

  3. Now, simply Download and reinstall Adobe Flash Player

Solved “There was a problem opening a secure connection to Google.” Error 110

May 16, 2010

migration-imgHave you got this error while importing posts from Blogger to WordPress? It says:

There was a problem opening a secure connection to Google. This is what went wrong:

Connection timed out (110)
[ad#ad-2]
It is simply because you don’t have SSL support in your server. To import posts, your WordPress hosting server needs to create a HTTPS session with your Google account. So if you are looking to transfer from Blogger to WordPress & buy a paid hosting for that, then you should check whether your hosting package supports SSL or not.

If you are using free hosting, still you can import it.by following the steps below:

1) Create a wordpress.com blog.

2) Then import from Blogger to that blog. You would have no problem as wordpress.com admin is on secure server.

3) Then create an export file from it.

4) Now import that file in your own WordPress blog.

[ad#ad-2]Remember to delete the wordpress.com blog then. Otherwise, you may get penalized for duplicate content.

Simplest Way for Making gallery submissions

May 7, 2010

gallery-submission-firefox[1]It is always complicated for Designers for  Submitting designs to galleries.In contrary to that this post is to give you an overview on the procedure I follow to make this easy. If you have better ideas please do contribute via the comment form below.

Requirements:

1. Firefox Sorry IE users!
2. InFormEnter AddOn for firefox
3. Details about your logo/website (will explain this below)
4. Image of your logo in various dimensions (will explain this as well)

gallery-submission-firefox[1]

In this post I’ll walk you through my logo design submission process, which can be made use for CSS gallery submissions as well.

Step 1: Bookmarking the gallery forms

The first step is to bookmark all the submission forms of famous galleries. I know it’s not that easy, but trust me it will make things easy. Open a blank firefox window and then open all the logo gallery submission forms mentioned here in separate tabs. Once you’ve opened all, go to Bookmarks Menu > Bookmark All Tabs (or Shift + Cmd/Ctrl + D)

bookmarking-using-firefox[1]

This would open a pop-up, wherein you can add a name for the bookmark folder. Choose ‘Bookmarks Toolbar’ from the dropdown and click the “Add Bookmarks button”.

bookmark-popup3[1]

Now You’ve created a ‘Bookmark folder’ for your logo submission which you can now access from your Bookmarks toolbar.

bookmarks-toolbar[1]

Whenever you come across a new submission form you can add them to this folder.

Step 2: Prepare a list of all possible form fields

The next task is to make a list of all possible submission form fields. I’ve created one for logo design submission. If you’re the creator of the logo, the first 8 items remain same for all your logo submissions. We’ll see how to make use of this list in the next step.
————————————-
First Name
Last Name
Full Name
Email Id
Twitter Id
Designer Website Title
Designer Website URL
Designer Bio

Title/Name of the logo
Logo Punchline/tagline
Logo URL (if your logo is already online)
Description of logo
————————————-

Step 3: Using InFormEnter to fill the forms

I hope you’ve already installed this addon. If not do it right now, it’s really worth! Now you should see a blue arrow icon on the bottom right of your Firefox status bar. Click the icon and select “InFormEnter Options”.

informenter-addon[1]

So you have the pop-up ready to enter the list of form fields mentioned above. See the image below to know how I created the list for the “Beetle Nut” logo

informenter-popup[1]

Step 4: Prepare your images for submission

his is critical since the image dimensions accepted by each gallery varies. Here goes a list of sizes accepted by most logo galleries.
————————————-
284×130
300×180
320×260
325×260
394×197
400×400
500×247
500×300
550×338
620×340
640×360
880×440
————————————-
I usually create a folder for each logo, re-size the logos and name them based on these dimensions. But make sure the file size is low. See the images below.

logo-dimensions[1]

This makes the form submission process easy!

logo-select[1]

Step 5: Start Submitting… Enjoy!

Once InFormEnter is activated you would notice a blue icon near each form field. Now all you need to do is click the icon and select the entry! As simple as that!

start-submission[1]

16 Things Necessary to Do After Starting New WordPress Blog

May 6, 2010

You just started a new WordPress blog, now what’s next? Read on…

 
1. Blog Design: You can start with a freely available WordPress theme, but a unique blog design is the way to go if you want your blog to stand out from the other blogs.

 
2. Add Categories: Add the categories for your blog. Remember to keep it neat and add not more than 15-20 categories.

 
3. Add an About Page: I have already wrote about the importance of an About page, add it and let your readers know who you are.

 
4. Install All In One SEO Pack: Install the latest version of All In One SEO Pack WordPress plugin and optimize your new blog from the beginning itself. Remember to visit the plugin’s option page. Also check out the other WordPress Plugins that can optimize your blog for Search Engines.

 
5. Customize Permalink Structure: Choose a good Permalink Structure and stick with it. Here are some examples of good Permalinks: /%year%/%monthnum%/%day%/%postname%/ /%postname%/ If you change your permalink structure after you have been linked by other sites, those links won’t work anymore. So remember to stick with the Permalink Structure you chose in the beginning

 
6. Create a FeedBurner feed for your blog: Login to FeedBurner and create a FeedBurner feed for your new blog

 
7. Install the FeedBurner FeedSmith plugin: The FeedBurner FeedSmith plugin detects all ways to access your original WordPress feeds and redirects them to your FeedBurner feed so you can track every possible subscriber

 
8. Put a RSS button on your blog: Choose one of these RSS buttons and put it on your blog linking it to your FeedBurner feed

 
9. Start Writing: What’s a blog without content? Start blogging!

 
10. Install the Google Sitemaps plugin: This plugin will generate a sitemaps.org compatible sitemap of your WordPress blog which is supported by Ask.com, Google, MSN Search and YAHOO. Download the latest version of the plugin from here.

 
11. Create a Robots.txt file: Once you have generated your sitemap with the Google Sitemaps plugin, create a robots.txt file and add your sitemap there like in the following example:

Sitemap: http://www.yourblog.com/sitemap.xml

User-agent: *

Disallow: /wp-content/

Disallow: /wp-admin/

Disallow: /wp-includes/

Disallow: /wp-

Disallow: /feed/

Disallow: /trackback/

Disallow: /cgi-bin/

User-agent: Googlebot

Disallow: /*.php$

Disallow: /*.js$

Disallow: /*.cgi$

Disallow: /*.xhtml$

Disallow: /*.php*

Disallow: */trackback*

Disallow: /*?*

Disallow: /z/

Disallow: /wp-*

Disallow: /*.inc$

Disallow: /*.css$

Disallow: /*.txt$

 
12. Add your Sitemap to Google Webmaster Tools: Add your new site to Google Webmaster Tools and then your sitemap too. Once you add your site, you will be able to find when Googlebot last successfully accessed your home page, web crawl errors, etc.

 
13. Set preferred domain: Select your site from your Google Webmaster Tools dashboard and set your preferred domain (with or without www) by going to Tools>Set preferred domain.

 
14. Install Akismet plugin: Download and install Akismet plugin to catch comment spam.

 
15. Add a Contact form: Install a plugin that adds a contact form to your blog so that your readers can get in touch with you. I use PXS Mail Form.

 
16. Install Subscribe to Comments: Install the Subscribe to Comments plugin which allows commenters on your blog to check a box before commenting and get e-mail notification of further comments. This encourages readers to come back and take part in the conversation.

I haven’t mentioned the Related posts plugin as it isn’t much of a use until you have lots of posts.

Have I missed anything? Let me know through comments and I will add it to the list.

Dell Streak tablet leaked 7inch,1o inch and on the row 5 inch

April 17, 2010

NowDell is also making tablet in order to response Apple Ipad.

Engadgets, who first got this information and images of this stylish tablet.

Accoding to them Dell is going to launch 7-inch, 10-inch models join 5-in tablets which are expected to be launch in june or in some next months.

In the mean time Google is also going to lauch Android-based AT&T smartphone, the Aero, which is expected in June.

so at conclusion i will say apple get ready for strong competition in upcoming days.

[ad#ad-2]
[ad#ad-2]